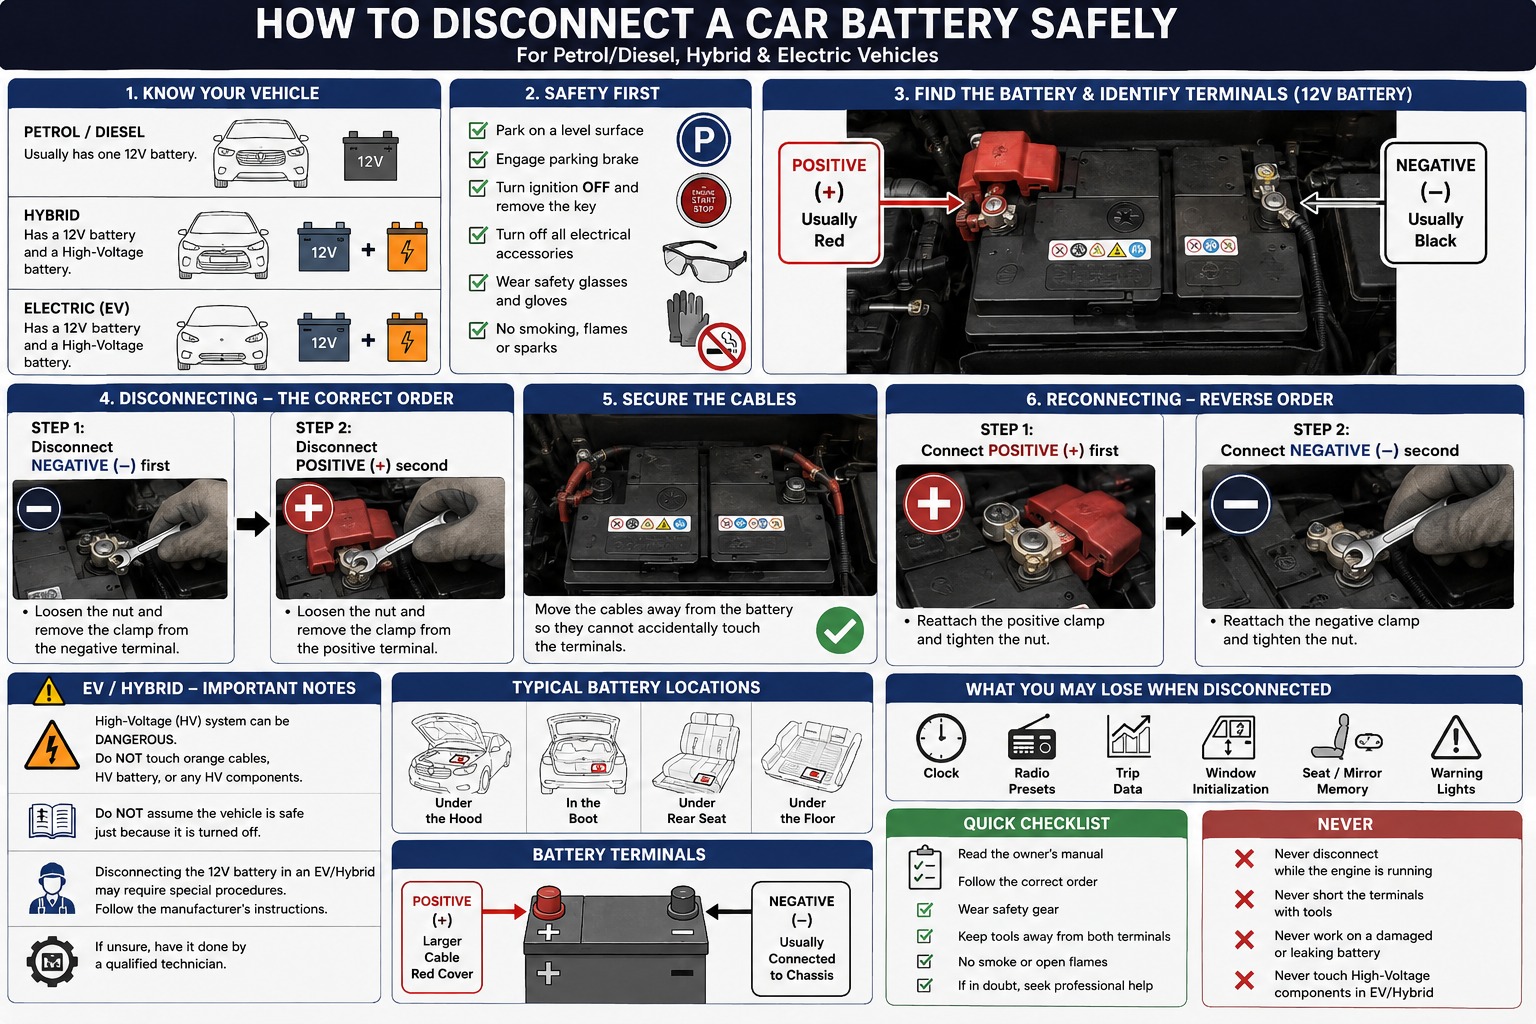
If a first-time car owner asked how to disconnect a car battery safely, the very first thing worth clarifying is this: a normal petrol or diesel car and an electric car may both have a 12-volt battery, but an electric or hybrid car can also have a high-voltage traction battery, and those are completely different things. Disconnecting a conventional 12V battery can often be a reasonable DIY job if the vehicle manufacturer permits it, but disconnecting or opening a high-voltage EV or hybrid battery is not a beginner DIY procedure. Here is exactly how to approach it, step by step.
Step 1: Identify What Type of Vehicle You Have
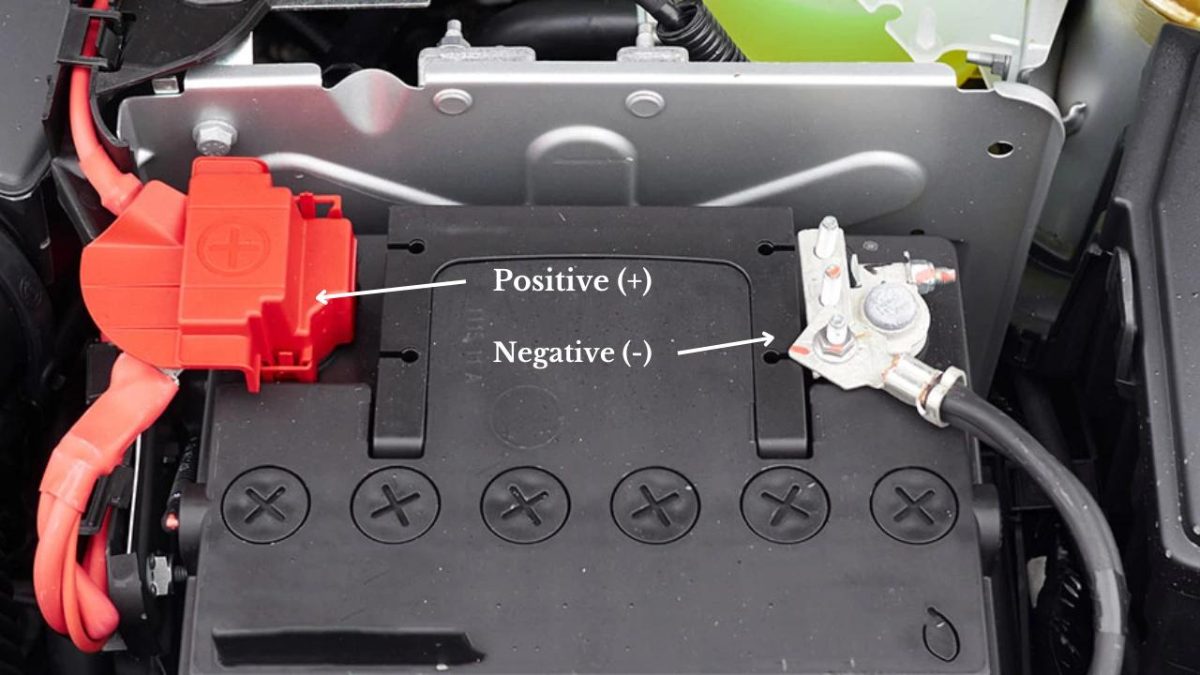
Before you even think about tools, there are three situations worth distinguishing.
Petrol or Diesel Car
This usually has a conventional 12V battery, which supplies electricity for starting the engine, lights, radio, locks, the dashboard, onboard computers, and accessories. When the engine is running, the alternator normally recharges it.
Hybrid Car
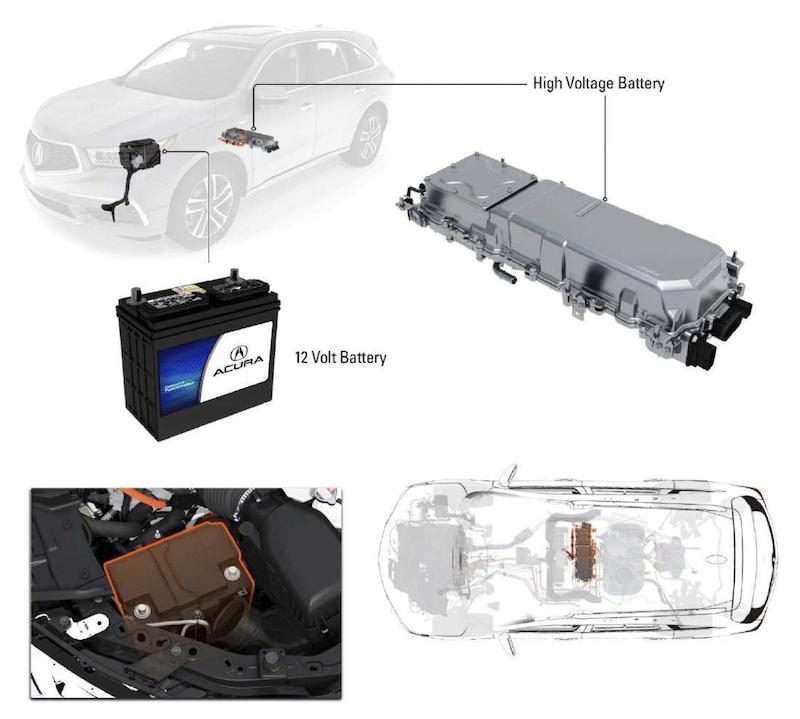
A hybrid can have both a 12V battery and a high-voltage traction battery, and the two serve different purposes. Do not assume that disconnecting the 12V battery makes the high-voltage system safe — it does not.
Fully Electric Car
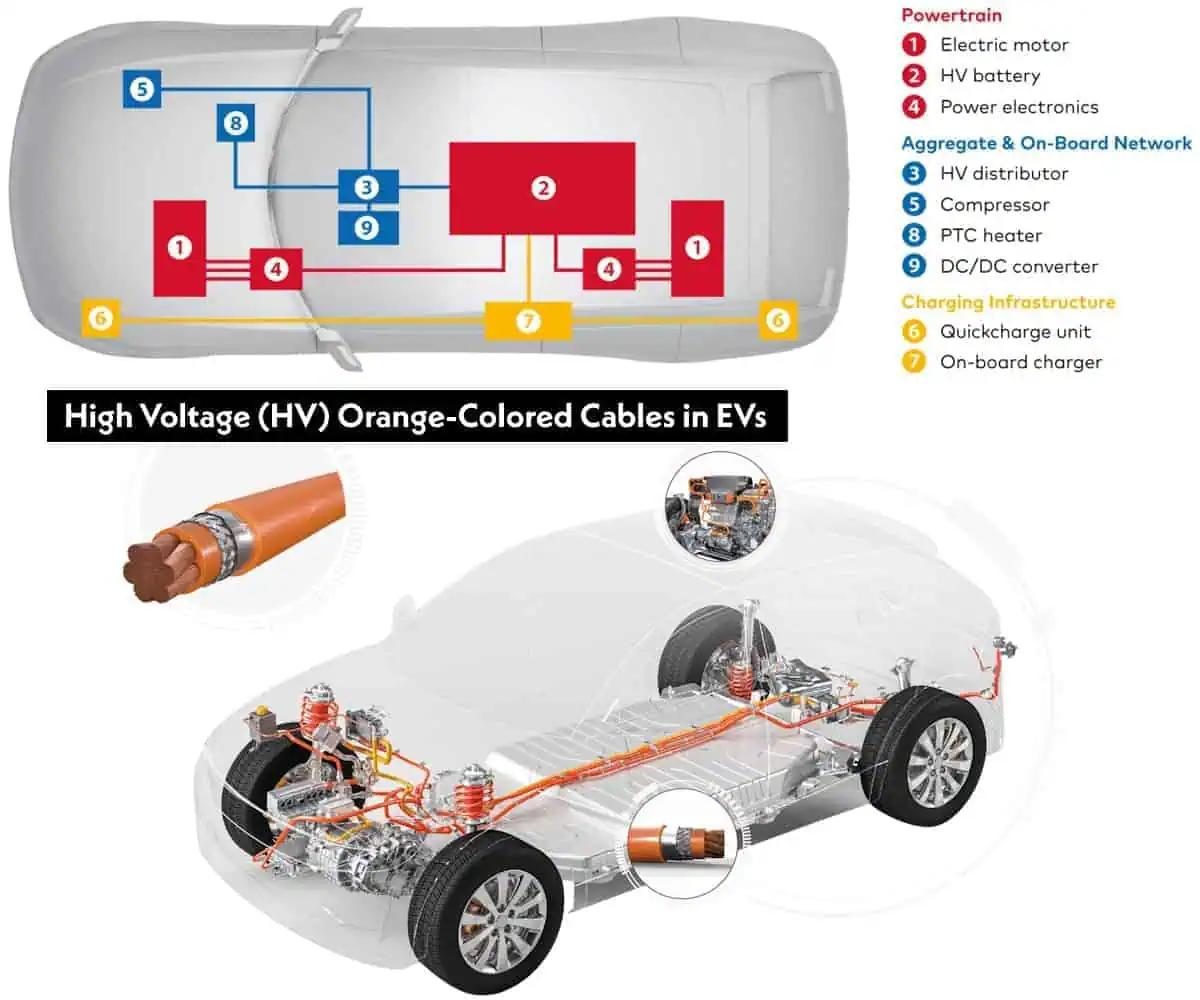
An EV normally has a 12V low-voltage battery that powers many conventional electrical systems and helps operate the vehicle's computers and contactors, plus a much larger high-voltage traction battery that powers the electric drive system. You should not disconnect the high-voltage battery yourself unless you are specifically trained and following the manufacturer's high-voltage service procedure.
Step 2: The Most Important Rule — Read the Manual First
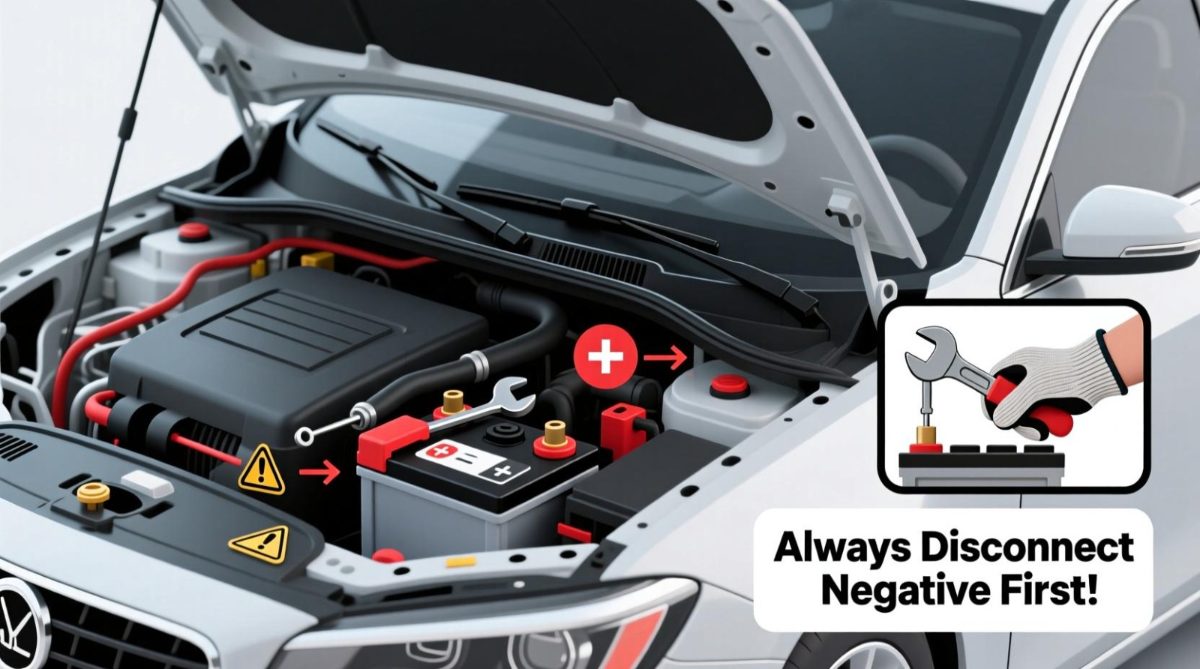
Before touching anything, read the vehicle's owner's manual or manufacturer's service instructions, since battery locations and procedures vary. The 12V battery might be under the bonnet, in the boot, under a seat, under the floor, or in another protected compartment. Some modern vehicles also have battery monitoring sensors and special procedures, and some require electronic initialization after battery disconnection. Don't assume every car works exactly the same way — the basic principles are similar, but the manufacturer's procedure always takes priority.
Step 3: What You Need
For a conventional 12V battery, you will generally need:
• Safety glasses
• Protective gloves
• Correct-size wrench or socket
• A flashlight if necessary
• The vehicle owner's manual
You don't need to touch the battery with bare hands, and you don't need a huge collection of tools.
Step 4: Prepare the Car
Before disconnecting a conventional 12V battery, park on a stable, level surface. Put the transmission in P (Park) for an automatic transmission, or in Neutral with the parking brake engaged for a manual transmission. Turn the ignition completely off and remove the key. If the vehicle uses keyless entry, keep the key away from the vehicle so it doesn't accidentally wake the systems. Turn off the headlights, radio, interior lights, air conditioning, accessories, and any chargers. Close the doors if appropriate, but be careful not to lock yourself out.
Step 5: Wait Before Touching the Battery
Modern vehicles have computers that may remain active for several minutes after you switch the vehicle off. Allow the vehicle to enter its normal sleep or shutdown state according to the manufacturer's instructions — this is particularly important on modern luxury vehicles and vehicles with extensive electronic systems. Don't immediately start disconnecting wires the second you switch off the ignition.
Step 6: Find the Positive and Negative Terminals
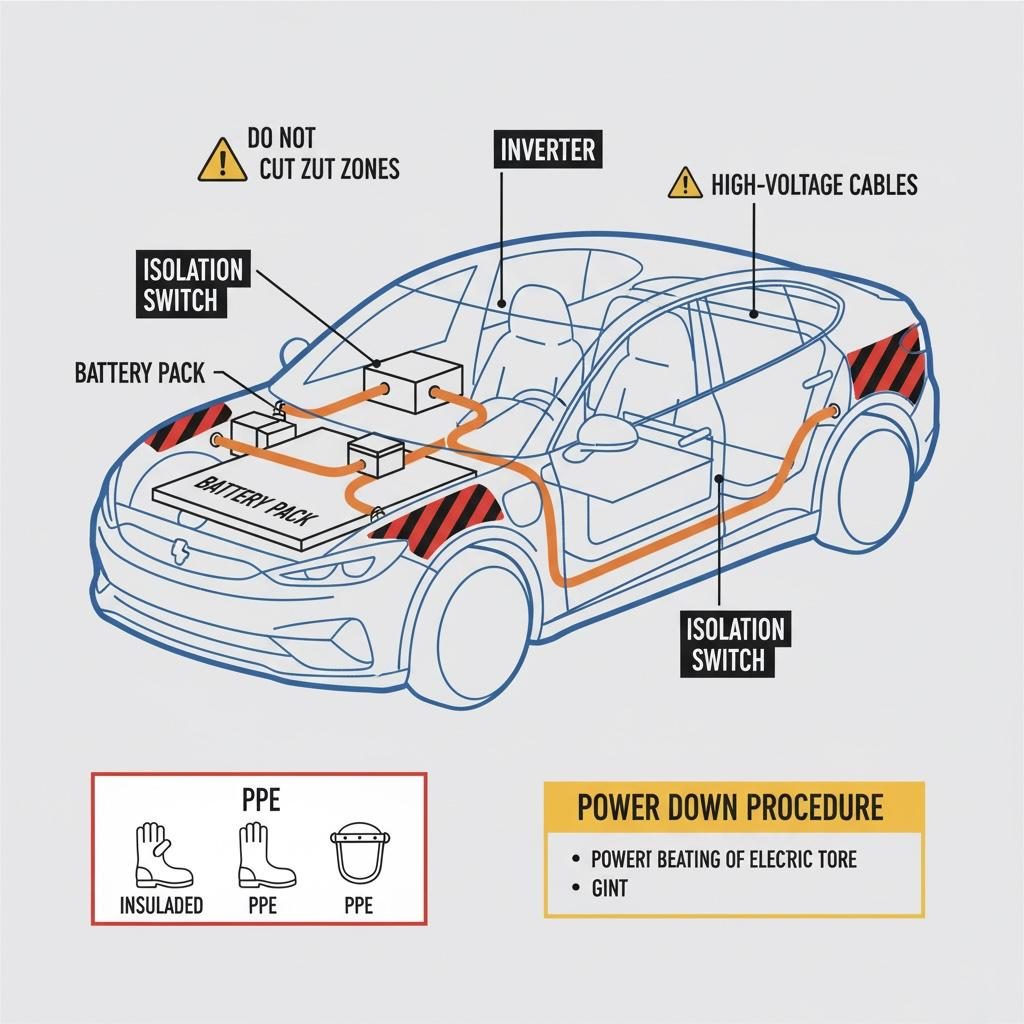
This is extremely important. A battery has two main terminals. The positive terminal is usually marked with a “+” symbol and may have a red cable or red protective cover. The negative terminal is usually marked with a “−” symbol and is normally connected to the vehicle's body or chassis ground; it may have a black cable, but don't rely only on cable colour — look for the actual + and − markings.
Step 7: Why the Order Matters
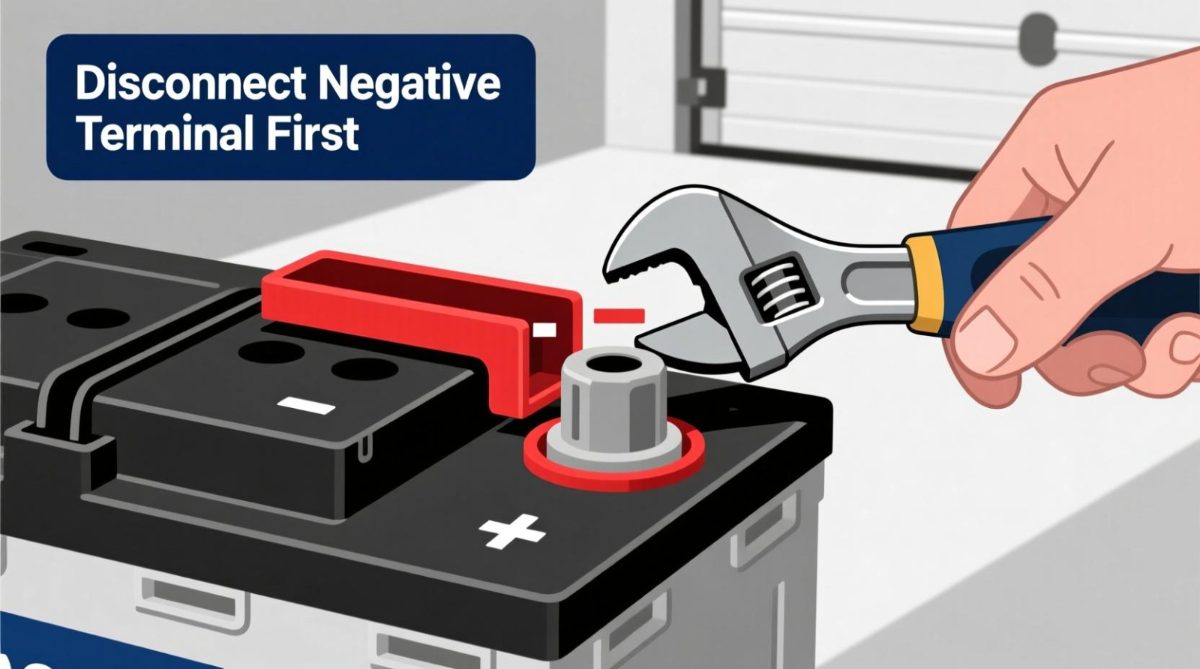
For a conventional 12V battery, the normal rule is to disconnect negative first, then disconnect positive. When reconnecting, it's the reverse: positive first, then negative. A simple way to remember it: off means negative first, on means positive first.
Why does this matter? The vehicle's metal body is normally connected to the negative side of the electrical system. If you disconnect the negative terminal first, the vehicle's body is no longer part of a complete circuit through the battery's negative connection, which reduces the likelihood of accidentally creating a short circuit if your metal tool touches the body while working on the positive terminal.
How to Disconnect a Car Battery, Step by Step
Assuming the owner's manual permits normal battery disconnection, here is how to disconnect a car battery on a conventional petrol or diesel vehicle.
Step 1 — Switch the Vehicle Off
Engine off, ignition off, and the key kept away from the vehicle.
Step 2 — Open the Battery Compartment
Locate the battery and identify the + positive terminal and the − negative terminal.
Step 3 — Disconnect the Negative Terminal
Use the correct-size wrench or socket to loosen the negative-terminal clamp. You generally don't need to completely remove the nut from the clamp — once it's loose, remove the cable from the battery post and position it so that it cannot accidentally spring back onto the terminal.
Step 4 — Disconnect the Positive Terminal
Now loosen and remove the positive-terminal clamp. Be particularly careful with your metal tool around the positive terminal, and do not allow a metal tool to simultaneously contact the positive terminal and the vehicle body, since that can create a short circuit.
Step 5 — Secure the Cables
Make sure the disconnected cables cannot accidentally touch the battery terminals. At this point, the conventional 12V battery is disconnected.
Critical Warnings Every Beginner Should Know
Never Let Your Wrench Bridge the Terminals
This is one of the biggest mistakes beginners make. If your metal wrench touches the positive terminal and the vehicle body at the same time, you can create a short circuit, and the resulting current can be extremely high. You could get sparks, hot metal, burns, battery damage, tool damage, or electrical-system damage, and in severe situations a battery can be damaged or vent gas that may ignite. Keep metal tools controlled at all times.
Never Smoke Around a Battery
Lead-acid batteries can produce hydrogen gas, particularly during charging or under certain conditions, and hydrogen is highly flammable. That means no cigarettes, no open flames, no sparks, and no working beside anything producing ignition sources — always work in a well-ventilated area.
Be Careful With Damaged Batteries
Don't casually handle a battery that is cracked, leaking, swollen, extremely hot, damaged after an accident, or giving off an unusual smell. Battery acid can cause serious burns and damage clothing and materials. If the battery is damaged, stop and have it handled appropriately rather than treating it like a normal battery-disconnection job.
What Happens When You Disconnect a Normal Car Battery
This is another thing worth knowing before you begin. Disconnecting the battery can reset or erase certain stored settings, and depending on the vehicle you might lose the clock settings, radio presets, trip information, automatic window initialization, seat or mirror memory in some vehicles, steering-angle calibration information, or certain learned engine and transmission parameters. Some vehicles may display warning messages after reconnecting — this doesn't necessarily mean you've damaged the car, since the vehicle may simply need its systems reinitialized.
Modern Cars Can Be More Complicated
Older cars were relatively simple: disconnect the battery, reconnect it, drive away. Modern vehicles can contain many interconnected control modules, and after battery replacement or disconnection some vehicles may require window initialization, steering-angle calibration, battery registration, idle relearning, transmission relearning, diagnostic-code clearing, or driver-assistance calibration. This is why it is always worth checking the specific vehicle's service procedure.
Battery Replacement Is Not Always the Same as Battery Disconnection
This is an important distinction. If you're simply disconnecting the battery temporarily, you may not need to perform all the procedures associated with installing a new battery. But if you're replacing a battery, some modern vehicles need the new battery registered with the vehicle's battery-management system — the vehicle may need to know that a new battery has been installed, which can be particularly important on vehicles with sophisticated charging systems.
Reconnecting the Battery
When you're ready to reconnect a conventional 12V battery after you disconnect a car battery for maintenance or repair, reconnect the positive terminal first. Make sure it is seated properly and tighten it according to the manufacturer's specification, without overtightening it. Then reconnect the negative terminal, again ensuring it is properly seated and tightened, and check that the connections don't move excessively by hand — don't try to make them impossibly tight.
After Reconnecting
Don't immediately assume everything is fine. Switch the vehicle on and check the dashboard warning lights, clock, windows, central locking, lights, radio, instrument cluster, steering, HVAC, and driver-assistance systems. Some warning lights may disappear after the vehicle is driven or after systems complete their initialization; if a warning remains, consult the owner's manual or have the vehicle scanned.
Electric and Hybrid Vehicles: A Completely Different Category
This is where far more caution is required, and where the rules for how to disconnect a car battery change completely. An EV can have a normal-looking 12V battery, but it also has a high-voltage traction battery that can contain hundreds of volts — a completely different safety category from a conventional 12V battery. A beginner should never disconnect the orange high-voltage cables, remove high-voltage covers, open the traction battery, or attempt to service the high-voltage system. The fact that the vehicle is switched off does not mean the high-voltage system is automatically safe to touch.
What Does the 12V Battery Do in an EV?
This surprises many people. An EV still needs low-voltage electrical power, and the 12V system can operate computers, lights, locks, screens, sensors, control modules, and safety systems, while the high-voltage battery is primarily responsible for driving the electric motors and supporting high-power systems. As a result, an EV can end up in a strange situation where the large traction battery has plenty of energy, but the vehicle's 12V system is dead — in which case the vehicle may appear completely dead even though the main battery is fine.
Can You Disconnect an EV's 12V Battery?
Sometimes the manufacturer provides a procedure for doing so, but don't assume the procedure is identical to a petrol car. Different EV manufacturers have different architectures and service procedures; some require specific shutdown procedures before the 12V battery is disconnected, some have special terminals or service points, and some have additional electrical components connected to the 12V system. Always follow the exact manufacturer's procedure for the specific EV, and if the manual doesn't provide a consumer procedure, have the vehicle serviced by a qualified technician.
What About Jump-Starting an EV?
This varies significantly by manufacturer. Some EVs allow a conventional 12V jump procedure for the low-voltage system, some provide dedicated jump points, and some give explicitly different instructions. Always use the manufacturer's specified jump-start points and procedure, and never connect a conventional jump pack directly to an EV's high-voltage battery or attempt to “jump” the traction battery using ordinary 12V equipment.
A Special Issue: The Car May Need the 12V Battery to Unlock Itself
In some EVs, the door handles, electronic locks, and other systems depend on the 12V system, so before disconnecting a 12V battery, think ahead — you don't want to disconnect the battery and then discover you can't open the electronic boot. This is another reason to follow the manufacturer's procedure and understand how the vehicle provides mechanical or emergency access.
Why Is an EV's High-Voltage System Dangerous?
High-voltage electrical systems can cause severe electric shock, burns, arc flash, serious injury, or death, and some high-voltage components can retain electrical energy even after the vehicle is switched off, until the system has been properly isolated and discharged according to the manufacturer's procedure. This is why EV technicians use specific training, insulated tools, personal protective equipment, isolation procedures, test equipment, and lockout/tagout procedures — a normal household toolbox isn't sufficient for high-voltage EV work.
If an EV Has Been in an Accident
This is particularly important: if an EV or hybrid has been involved in a serious collision, don't assume that because the car is off, it's safe. High-voltage components and cables can be damaged, and there can also be risks involving the battery pack, damaged wiring, and delayed thermal events. If the vehicle has significant collision damage, flooding, or battery damage, have it assessed by appropriately trained professionals, follow the manufacturer's emergency guidance, and don't crawl underneath it looking for the battery disconnect.
If the EV Won't Start
Don't immediately start disconnecting random cables. First determine what “won't start” actually means: is the vehicle completely dead, showing dashboard lights, unlocking, showing a 12V warning, showing a high-voltage warning, reporting a charging fault, or showing an immobilizer message? An EV with a weak 12V battery can require a manufacturer-approved jump-start or 12V recovery procedure, which is entirely different from trying to access the high-voltage battery.
Aftermarket Electronics and Alarms
If the vehicle has aftermarket equipment such as alarm systems, dash cameras, GPS trackers, audio amplifiers, remote starters, additional lighting, refrigerators, or inverters, there may be additional wiring connected to the battery. Don't assume the factory wiring is the only wiring — if you're unsure, have the installation inspected before you begin.
A Few More Things Worth Knowing
Battery Isolation vs. Battery Removal
These aren't always the same thing. Battery isolation means electrically disconnecting the battery from the vehicle, while battery removal means physically taking the battery out. A heavy conventional lead-acid battery can weigh a considerable amount, so use proper lifting technique, don't drop it, and don't tilt a conventional battery unnecessarily, especially if it contains liquid electrolyte.
What If the Battery Terminal Is Stuck?
Don't start hitting the terminal aggressively, don't force the battery post sideways, and don't use excessive force that could damage the battery or terminal. Use the correct terminal-removal method and appropriate tool, and if corrosion has seized the connection, professional assistance may be preferable.
What Does Battery Corrosion Mean?
You may see white, blue, or greenish deposits around battery terminals, which indicates corrosion. It can increase electrical resistance and cause difficult starting, charging problems, or intermittent electrical faults. But don't clean a heavily corroded or damaged battery casually without understanding the battery type and appropriate safety procedure — protect your eyes and skin.
One Mistake to Absolutely Avoid
Never disconnect a running conventional car's battery to “test whether the alternator is working.” You may hear old mechanics recommend this, but don't do it on modern vehicles — disconnecting the battery while the engine is running can cause voltage disturbances and potentially damage electronic components. Use a proper charging-system test instead.
Quick Safety Checklist: Conventional 12V Battery
Before touching a conventional 12V battery, make sure of the following:
• The vehicle is parked safely
• Engine/ignition is off
• Key is removed or kept away where appropriate
• Parking brake is engaged
• You have checked the owner's manual
• You have identified positive and negative correctly
• You are wearing eye protection
• There are no flames or smoking nearby
• You have suitable tools
• You know whether the vehicle has special battery-management requirements
• You understand that disconnecting the battery may reset settings
Then, for a conventional 12V system where the manufacturer permits it: disconnect negative first, disconnect positive second. When reconnecting: connect positive first, connect negative second.
Quick Safety Checklist: EV and Hybrid Vehicles
For an electric or hybrid vehicle:
• Identify whether you are dealing with the 12V system or the high-voltage system
• Read the manufacturer's procedure
• Do not touch orange high-voltage cables
• Do not open the traction battery
• Do not remove high-voltage covers
• Do not assume switching the vehicle off makes the high-voltage system safe
• Do not attempt high-voltage repairs without appropriate training
• Use manufacturer-specified jump points and procedures
• Treat collision-damaged or flooded EVs/hybrids as potentially hazardous
• If you're unsure, use a qualified EV/hybrid technician
Read on How to Clean Car Seats the Right Way
The One Thing to Remember
If you have a normal petrol or diesel car with a conventional 12V battery, battery disconnection is often straightforward when the manufacturer's procedure permits it: off, negative off, positive off, and later, positive on, negative on, then check the vehicle. But if you have an EV or hybrid, stop and identify which battery you're dealing with, because a 12V battery is not the same thing as a high-voltage traction battery. The 12V system may be accessible to an owner under the manufacturer's instructions, while the high-voltage system should be treated as professional-service equipment. And if there is any uncertainty about the battery — damaged wiring, an accident, swelling, leaking, unusual heat, smoke, or a high-voltage warning — don't experiment with it. The safest decision when you plan to disconnect a car battery under any uncertain condition is sometimes to stop troubleshooting and get the vehicle to a properly equipped technician.